
Today’s accomplishment–17 half-pints of apple butter. And I’m just getting started. It’s apple butter season! I have an order for 30 half-pints of apple butter to get out in a couple of weeks, so I’m working on that, plus I need to up my stock before the holidays when it’s a popular item in my Etsy shop. And I need some extra to tuck back for me, too. I’ll be making apple butter for the next couple of weekends.
You can buy some apple butter from me (you can find it here)–but you can make it yourself! I’ve been sharing my recipe for apple butter for years, and I thought now was a good time to share it again after something my customer (the one who ordered the 30 jars) mentioned to me. She had bought a jar of apple butter, to sample, from another shop. (Not mine!) This was previous to her coming to my shop. Since she was planning to order a large quantity that she is giving out at an event, she ordered a jar first to try it out. She was quite distressed with what she received. She said the jar wasn’t filled anywhere close to the top, it was overly sweet, there were apple peels throughout the apple butter, and there was even rust on the jars. (Yikes!) After that experience, she came to my shop. Happily, after she had ordered a jar from me to sample, she was thrilled with it and came back to order 30 more for her event.
I have no idea who she ordered the other jar of apple butter from. I’m just glad I passed the test with mine! But it did make me think of posting about the marvelous, magical Squeezo again. Don’t make the mistake of apple peels in your apple butter! Nobody likes that! Whether you’re making it for yourself, for gifts, or selling it (what? stop that! ha), make it easy–and right. Use a Squeezo!
This is the Squeezo that I have. It’ll make short work of a box of apples!
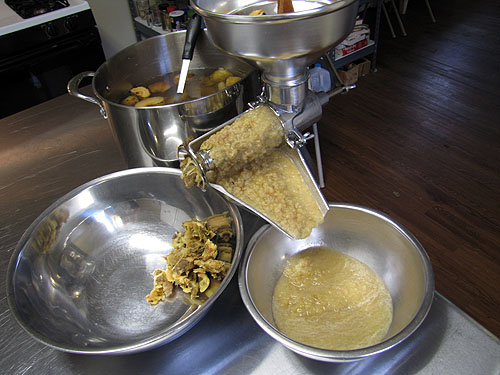
If you’ve never heard of the fabulous Squeezo, it is the best food strainer ever invented. I have a Squeezo tutorial here.
And here is my tried and true apple butter recipe. This recipe is written per quart so that you can multiply it by however many quarts of sauce you have available. (You make the sauce using the Squeezo.)
 Printer-Friendly
How to make Apple Butter:
Per quart applesauce–
1 to 2 cups sugar*
1 teaspoon cinnamon
1 teaspoon allspice
1 teaspoon cloves
*Adjust amount of sugar to suit your taste. Start with the lower amount and see how you like it. I really don’t like my apple butter to be super sweet, but that’s me. Remember that as you cook it down, the flavors will intensify, which is another good reason to start on the low end with the sugar.
I simmer my apple butter in big crock pots. Whatever you’re using, combine the applesauce, sugar, cinnamon, allspice, and cloves in the pot and mix well. Simmer for several hours, stirring occasionally. I often simmer ALL day to get to the thickness I prefer. (Sometimes into a second day!) Side benefit: your house smells awesome while you’re doing this.
Process pints or half-pints in a boiling water bath 10 minutes. And fill those jars up–you don’t need to leave more than 1/2-inch headspace. (I use a steam canner.)
Happy apple butter season!